Showing posts with label Holidays. Show all posts

Friday, December 19, 2014

Mitten Gift Card Holder

I never thought I’d utter these four words…I miss the snow. It’s crazy to think I’m missing the snow right now as it just doesn’t seem like Christmas, much less December, without the snow!

Add to that craziness, the last two weeks have been ridiculously busy and go-go-go. All last week I battled migraines, headaches and nausea which left me feeling tired and grumpy. Not a happy crafter and not productive at all. This week has been non-stop with wrapping up some work projects before taking off to spend Christmas with my family. I have been grateful for the busyness though as it’s made the week go by quickly as I count down the days in anticipation of getting to hug my mom and dad! :)

So tonight, I’m sharing a project that was made quite awhile ago since I haven’t had time to play, and is reminiscent of the days when we will finally get snow that stays longer than 24 hours in the valley.

Mitten Gift Card Holder 

This little mitten gift card holder is a Silhouette cut file and is super simple to put together! Although the actual ribbon trim and paper I used is no longer available, you can definitely substitute with other colors to create your own cute gift card holder!

I’m hoping I can squeeze some play time in among my lengthy to do list! Wish me luck!

Tuesday, December 9, 2014

Sparkly Christmas


Sparkly Christmas Tree

Sharing a super quick card today. This Be Jolly set from Technique Tuesday was another I had previously won and finally inked it up. I love this tree shape with the fillable ornaments and thought it would be perfect for the color challenge at Just Add Ink.  A simple star and bakers twine topped off the card, but it’s the bright and festive colors that make it fun.

Sparkly Christmas Tree Close Up

Although hard to tell in the photo, I added dazzling diamonds to the garland across the tree.

JAI 201 buttons-016

Thursday, December 4, 2014

Noel

Noel

I love making Christmas cards. You can go traditional in red and green colors or go snowy with blues - either works!  This card wasn’t my favorite but some friends said it was their favorite out of a bunch we had at my Christmas Card Class. You never know what people are going to love!

Noel Close Up

Lovely as a Tree has been one of those stamps that I’ve had for years but it’s still in the catalog! It must still be super popular since it’s still around! I have my wood mount stamp set (really need to take the time to convert my favorites to clear right?!) and used the lone pine tree for this card.

Stamp in a lighter color and then slightly stamp off in a darker color to create a shadow of your image. I used Smoky Slate and Night of Navy here, and used those same colors throughout the card. The card base was embossed with the Northern Flurries embossing folder.

Linking up today to The Card Concept for their snow/tag on a card challenge (using the Clean and Layered Style) and the Paper Players for the  tic-tac-toe challenge using the tree, embossing and glitter row, or you could say the star, die cut and glitter row works as well. ;)


24   pp224

Saturday, November 29, 2014

Holiday Calories Don’t Count

I wish that were true. I would have eaten more pie this year.

Calories Don't Count

Speaking of pie, how about a card with a pie where the calories really don’t count?

This cutie little pie is the free shape of the week at the Silhouette Store.  I removed the “give thanks” and resized the pie pieces to fit on the front of a card. Sentiment from the October My Paper Pumpkin kit stamped in Momento Black. 

I struggled to come up with an idea for the EAT cue card at CASology until I remembered this free shape and the sentiment. It all came together so easily after! One of those moments I wanted to smack my forehead, ha. Using the sketch at Case This Sketch again because it was perfect for this concept.

Also linking up to My Pumpkin Challenge. If you’re delivering an extra pie or some Thanksgiving leftovers this would be the perfect accessory to your pie, right? ;)

 CTS_101Week 123 - Eat

Friday, November 28, 2014

Happy Wonderful Christmas

I’m not a Black Friday shopper, but I am heading out to meet up with some friends for lunch and to make a few purchases.

Posting a quick card before I head out the door!

Happy Wonderful Christmas

Playing along in more challenges today! Sketch from The Paper Players and color combo from Color Throwdown to use Kraft, Red, Aqua and Silver. Pretty straightforward card, but I did paper piece the ornament to give it a different look instead of coloring it in.

Happy Black Friday to anyone out shopping today!


pp223 swatch 320

Wednesday, November 26, 2014

Merry & Bright

Sometimes you get a crazy idea.

And then sometimes you actually act on that crazy idea.

Merry and Bright

After seeing the photo inspiration at Just Us Girls I had the crazy idea that I wanted to make a snowy and frosty wreath like the one in the photo. Queue the Time Out Challenge  for embossing with the optional twist of sparkle and pull in the sketch from Case This Sketch and your crazy idea just might work. Maybe.

Now, if I’m being honest this maybe doesn’t quite fit the CAS part of CASe this Sketch with all the sequins on the sparkly wreath, but overall it’s still pretty simple in design, right? ;)

I started with a Smoky Slate base and stamped the sequins from Hello Darling. I absolutely cannot put my wreath framelits down and die cut two wreaths in Whisper White, embossed both with Dazzling Diamonds and then layered them together with dimensionals. After adhering to the card base I began adding the sequins along with a die cut bow in glimmer paper. The sentiment from Endless Wishes was stamped and embossed in silver.

Super crazy, but I think I kinda love it. ;)

CTS_101 Screen Shot 2014-10-15 at 6.56.05 PM

Tuesday, November 25, 2014

Ornament Bauble

I hosted a Christmas Card Workshop for my friends this past weekend and we had a blast!

One of the cards we made used the new Christmas Bauble stamp. It’s a single wood-mount stamp, but makes such a big impact on your card!

Ornament Bauble

To color this in I used an “oldie” but a goodie – blender pens! I forgot how much I loved using these pens with my ink pads to color in images. It takes a little longer but I love the messy look you can get by scribbling in the lines which is exactly the look I was going for.

I embossed the Real Red card base with the Stylish Stripes embossing folder and then layered on a doily. The main image piece got a little depth with the center being punched out on a separate piece of cardstock and then lifted with a dimensional. Washi tape, dazzling details in cherry cobbler and the sentiment from Endless Wishes all brought the main image panel together.

Although a blender pen is technically not a “marker” I’m linking this up with SUO Challenges for their marker fun challenge, and to Merry Monday for their Red, Green and White challenge! We’ll count the gray as my neutral right? ;)

136

Sunday, November 23, 2014

One Layer Thanks

I feel like you might be getting holiday whiplash on my blog this week from the Christmas and Fall/Thanks(giving) cards lately. Also add to the fact that I’m posting twice in one day. It’s like a Christmas miracle, but prepare yourself for one more fallish card. Not making any promises this feather set won’t pop up again before I fully launch into winter and other holiday cards. ;)

Thankful Feathers

One layer cards are seemingly the easiest cards to make since you’re limiting yourself, but really there is a fair amount of restraint in not adding anything extra and making that one layer shine! There’s a  timed one  layer challenge over at Mod Squad and paired with this gorgeous color combo of Blackberry Bliss, Tangelo Twist and Hello Honey at Create with Connie and Mary this came together in less than two minutes! Pretty sure I spent more time debating the placement than it took to actually stamp! The overall Thankful for Fall theme at Catherine and Cathy Create tied it all together. The Very Vanilla base and gold sequins add a warm vibe vs. using a stark white card base.

We’re in for some snow tonight and tomorrow so seeing these pretty fall colors together keeps the winter chills at bay for a little longer…right? :)

6a01310fc1b623970c01b7c6f88dac970b-250wi ccc_icon-001 modsquadbadge1

Merry Christmas Wreath

Posting this quickly as we’re getting ready to head out and watch The Hunger Games (Mockingjay Part 1)!

Here’s a super simple and easy Christmas card using the Wondrous Wreath stamp set and matching framelits. There is quite a bit of texture and dimension to this card though to give it a little more pop.

Merry Christmas Wreath

I used the sketch from Pals Paper Arts and the color combo from Nacho Average Challenge to pull this together. The base is Early Espresso and the first layer is a Very Vanilla which was embossed with the Stylish Stripes embossing folder. To give the wreath added dimension, I die cut the lower layer and then stamped and die cut the top layer in Garden Green. Dimensionals adhere the two pieces together and I slightly rotated the top layer to make the wreath look fuller. I did the same treatment to the bow to lift it off the wreath. The sentiment from Endless Wishes was heat embossed with gold embossing powder on the Cherry Cobbler strip, and a Very Vintage vanilla button completed the card.

6a00e54f95df92883401b8d093d28d970c-400wi  nac116

Sunday, November 16, 2014

Paper Crafts & Scrapbooking

Change is hard.

Sometimes the change is good and the resulting outcome is even better than the way things were. Other times change seems like the worst possible outcome and you wish things could go back to the way it always had been.

The craft world reeled at the news last week that Paper Crafts & Scrapbooking Magazine would be ceasing publication after the February 2015 issue. While I had taken a crafty backseat in submitting the last few months, I like many others had come to find friendships through PCS and was always inspired by blog posts, Go-to-Gals and the monthly magazine and special issues. Now, all of that is going away. My heart aches for the talented editorial team as they search for new jobs and finish out the next couple weeks wrapping up and saying good-bye to the crafting community that lovingly embraced them.

Rather than dwelling on the sadness, I wanted to spend some time remembering the magazine that pushed me to become a better card maker and challenged me to try new and different things with each publication call. I was always impressed with the content of each magazine and felt incredibly fortunate to have my cards grace those glossy pages (and one COVER!), and sit alongside some of the best crafters in the industry.

I hadn’t shared the recent projects and cards I’d had published as I took a blog hiatus during the busy fall months, but thought I’d share those today. Previously shared published cards here.

The Holiday Cards & More, Vol. 9 came out in August (I saw it in Michael’s recently!) and I had 5 projects in this issue.

You can also view my cupcake wrapper on this post at the Paper Crafts Connection Blog.

A Gift for You Pillow Box

I loved this pillow box made with my Silhouette Cameo! Stamp, ink and cardstock from Stampin’ Up!

This goes a little out of order ;) but I had four projects in the October 2014 issue with one of those being featured on the cover!

October_2014_Cover_web

The cute “treats” container is my little project! I used my Cameo for every card in this issue! I LOVE crafting with it and it’s been by far my favorite Christmas present EVER! Thanks mom and dad! ;)

RIP Card

Here’s one other card I had in the issue, a tombstone card! I sponged the cardstock with ink to give it a weathered look. Literally took all of 5 minutes to create with cutting, sponging and adhering together. I love fast and cute cards!

Here’s to PCS! I wish the team the best of luck in their future endeavors and may they find the winds of change to be in their favor.

Friday, July 4, 2014

USA Banner & Independence Day!

Happy Independence Day & 4th of July!

I have a quick banner to share today and pictures from the parade we went to this morning.

First the banner, I used the Simply Created Build a Banner kit from Stampin’ Up! and added in the pinwheels from this months Paper Pumpkin kit. It was super easy to assemble using Real Red, Night of Navy and Black ink for the stenciled portions, and the pinwheels were super easy to fold and secure with a brad as they were already pre-cut. The Paper Pumpkin kit also included some cute stamps and paper straws I’ll have to put to good use soon!

DSC_0467 DSC_0468 DSC_0469 DSC_0470 DSC_0471 

Next, there is nothing better than a small town parade to celebrate the 4th and Independence Day!

My Mom made a request this year for me to recreate one of her favorite pictures. :) When the kids were little Jake would crouch down with them in anticipation of the parade starting and watch over them while they ran to get candy. It’s been several years since this photo below was taken (8 years ago!) and although I forgot they order they were in, we still got a new picture this year for my momma.

5-4-2007-04

Jake, Brady and Gwynie – 2006

Brady was three and Gwynie was seven….!!!!

DSC_0457

Jake, Gwynie and Brady – 2014

I love that some things never change like Gwynie and her long ponytail and my boys with their ball caps.

 DSC_0429 DSC_0432

Oh man, I caught that piece of candy and then dropped it!

 DSC_0436 DSC_0437 DSC_0438  DSC_0440

Brady was thrilled to get totally hosed down! It was so hot today! Check out his expression in the third photo!

 DSC_0447

Gwynie spent the majority of the parade texting her boyfriend. ;) He was in another parade going on around the same time for All-Stars.

    DSC_0459

Then both kids grabbed more candy, I think we have enough Salt Water Taffy to last us until Christmas!

We’re off to BBQ with Jake’s parents, check out the annual car show and then catch the fireworks later tonight. So thankful to be able to celebrate today and our freedoms!

Saturday, December 15, 2012

Christmas Brunch

I hosted some friends on Saturday morning for a fun Christmas Brunch and jewelry party. I had such a blast putting it all together!

Christmas Brunch

I had my table set up with lots of yummy breakfast foods, and my bakers rack served as a drink station. Come see!


DSC_0730

My bakers rack: the drink station!

DSC_0722

I decked it out with garland, beads and mini ornaments. These will definitely be staying up through Christmas!

DSC_0728

I had a tray full of coffee cups, creamer, sugar and coffee, and also had a cute glass jar filled with Bailey’s Irish cream to add to your coffee.

DSC_0736

I have a couple of these glass bottles, they were a fun find at Ikea a few months ago!

DSC_0732

I did mimosas on the main table, but on this area I had everything to make Dirty Shirley’s which are basically Shirley Temple’s with vodka! (Thank you for sharing these at Bunco and giving me a new favorite drink Lyndi!)

DSC_0733

Dirty Shirley

  • 2 shots cherry flavored Vodka
  • Sprite
  • Splash of Grenadine
  • Maraschino cherries to garnish

Add vodka over ice in your glass, fill with Sprite, add a splash of grenadine and then cherries to garnish and stir. Warning: totally good and dangerous! ;)

Now the main part of the brunch!

DSC_0738

DSC_0740

I kept my red table runner and wood tray centerpiece that I had out for my Christmas décor, and added a black tablecloth underneath. I accented the table with doilies, pinecones, candy cane candles and silk flowers with rhinestone brads in the center. In a few places I used mini clothespins to add the flowers to the containers.

DSC_0741

Let’s dig into the food!

DSC_0745

I found the mini cups (Wal-Mart) that I put syrup in and added triangles of French toast to the edges for an easy and portable treat.

DSC_0748

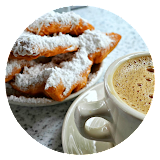
There were donut holes next to the French toast…..

DSC_0749

and a tray with silver ware, plates and candy canes.

DSC_0751

I also set out sausage and had a container of Special K and milk for any cereal lovers!

DSC_0750

I added a punched scalloped circle with a mini clothespin to the lid of the cereal container. For the milk carafe I tied some Christmas ribbon around it and added a silk flower with a green rhinestone in the center.

DSC_0752

I had a metal basket filled with hot cocoa mix and more candy canes, and another clothespin flower.

There were also teas, orange juice and lemonade.

DSC_0753

We also snacked on mini pancakes topped with blueberries and decorative picks. There was also a fruit bowl with mandarin oranges, pineapples and grapes!

DSC_0754

One more picture of these cute pancakes!

DSC_0757

The galvanized bucket/container held the chilled champagne for mimosas.

DSC_0756

These little flowers came from my scrapbook stash, I’ll definitely be reusing these!

DSC_0759

I also pulled out a few more things from my craft stash! I used bakers twine and more of the scalloped punched circles to make this simple cake topper. Christmas paper really added to the Christmas spirit and feel! :) This is Raspberry Liqueur cake that I got the recipe from my friend Sharon. It’s super moist and delicious!

DSC_0758


Raspberry Liqueur Cake

CAKE

  • 1 pkg white cake mix
  • 1 small instant vanilla pudding
  • 1 cup raspberry liqueur or framboise
  • 4 eggs

SAUCE

  • 1/2 lb. butter
  • 1/4 cup raspberry liqueur or framboise
  • 1 cup sugar

For the cake: Mix ingredients together well, bake in bundt pan at 350 degrees for 30 min. For sauce: Mix together all sauce ingredients in sauce pan, heat until melted. Don’t let it burn or get too thick. When cake is done, loosen sides and pour sauce over cake and sides. Let stand 20 minutes as sauce will soak into cake. Turn out onto cake dish.


DSC_0761DSC_0762DSC_0763

A few more shots of the whole set up!

DSC_0767

You may have noticed my “faux” chalkboard with the menu. Instead of an actual chalkboard, I used a black poster board and made it look more like a chalkboard by writing on it and wiping it off with a towel.

DSC_0779

It’s night time and all cleaned up but I think I’ll be leaving this up for awhile longer. :)