Showing posts with label DIY. Show all posts

Friday, July 4, 2014

USA Banner & Independence Day!

Happy Independence Day & 4th of July!

I have a quick banner to share today and pictures from the parade we went to this morning.

First the banner, I used the Simply Created Build a Banner kit from Stampin’ Up! and added in the pinwheels from this months Paper Pumpkin kit. It was super easy to assemble using Real Red, Night of Navy and Black ink for the stenciled portions, and the pinwheels were super easy to fold and secure with a brad as they were already pre-cut. The Paper Pumpkin kit also included some cute stamps and paper straws I’ll have to put to good use soon!

DSC_0467 DSC_0468 DSC_0469 DSC_0470 DSC_0471 

Next, there is nothing better than a small town parade to celebrate the 4th and Independence Day!

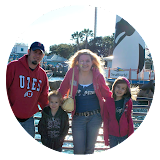
My Mom made a request this year for me to recreate one of her favorite pictures. :) When the kids were little Jake would crouch down with them in anticipation of the parade starting and watch over them while they ran to get candy. It’s been several years since this photo below was taken (8 years ago!) and although I forgot they order they were in, we still got a new picture this year for my momma.

5-4-2007-04

Jake, Brady and Gwynie – 2006

Brady was three and Gwynie was seven….!!!!

DSC_0457

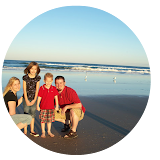
Jake, Gwynie and Brady – 2014

I love that some things never change like Gwynie and her long ponytail and my boys with their ball caps.

 DSC_0429 DSC_0432

Oh man, I caught that piece of candy and then dropped it!

 DSC_0436 DSC_0437 DSC_0438  DSC_0440

Brady was thrilled to get totally hosed down! It was so hot today! Check out his expression in the third photo!

 DSC_0447

Gwynie spent the majority of the parade texting her boyfriend. ;) He was in another parade going on around the same time for All-Stars.

    DSC_0459

Then both kids grabbed more candy, I think we have enough Salt Water Taffy to last us until Christmas!

We’re off to BBQ with Jake’s parents, check out the annual car show and then catch the fireworks later tonight. So thankful to be able to celebrate today and our freedoms!

Thursday, May 1, 2014

April Publications

I was so excited to have two cards in the April CARDS issue, but also exciting was to have a project in the Create: All About Baby issue that also came out in April!

Nursery Decor

This baby banner and matching frame are part of a set for the Nursery Decor section. I have a sweet friend that I can’t wait to give this to when I receive it back from the publisher! Hopefully she likes it. :) (Brittany – I am talking about you and Miss Kennedy here!)

Next, these two cards were previously on my blog so are kind of repeats, but wanted to reshare since I had taken them down upon notice of acceptance.

Easter Wishes Bunny Happy Spring 

Although Easter and Spring have passed, still good to have some ideas for next year!

Wednesday, August 22, 2012

Knock Off Canvas Art

The house is coming along, and eventually it will be complete but I’m realizing that everything is about baby steps.

One of the small baby steps I took in our room was adding some custom canvas art. 

DSC_0121
It all started and was inspired by the prints below from Z Gallerie. At $89.95 a piece though I knew I could create something that mimicked that sun print look that I loved.

nature-study-4-taupe-730535561


nature-study-3-taupe-730557894


And then I saw this popular little ditty on Pinterest and it sort of set the stage for my grand idea.

151363237446631618_YOKtYWsx_c

Guys, I was literally dancing up and down in my garage when this worked!

DSC_0052

Michaels was having a sale on canvases so I snagged a 7 pack of the 11x14 size for $14. Not too shabby for $2 a canvas! I also grabbed some Christmas-ey looking floral pieces that were a dollar each and used the gray spray paint I had on hand.

DSC_0055

I started off by laying the canvas down and the floral picks on top. I ended up moving them to their own boxes so I wouldn’t over spray on the other. I missed taking a pic of spray painting because this was a one woman show and I didn’t want to mess it up! BUT…I spray painted it AND….

DSC_0057DSC_0059

Then I lifted off the picks and was left with these images! Seriously, this was where I started dancing around my garage! I let the canvases dry for a day and then thought about frames.

DSC_0068

I liked the look of the plain canvas, but thought it would look more finished with a frame. I found these wood frames at the DI for $1 and a quick coat of black spray paint did the trick. I worried about how these would stay in the frames since the canvas clips I bought at Michaels were too big. Turns out they fit inside the frames perfectly!

DSC_0072

All that was left to do was to add some saw tooth hooks to the canvas so I could hang them in our bedroom.


DSC_0121

DSC_0124

I’m loving these little custom pieces of art work in our room that I created for less than $5 a picture!

I’m in the middle of working on lamp shades for our repurposed lamps, putting together our end tables and deciding which route to go for this back wall (I have a ton of ideas but can’t settle!)….but I thought it would be nice to show you where they are at in the room. Gah…I have this amazing picture in my head of all the variations on this room, I just need to decide and go for it! ;)

DSC_0118

Anyway, it’s a process and it’s baby steps, but I’m so excited with how these turned out!

DSC_0126

Hopefully the next time I share something on this room I have several DIY projects knocked out in here. ;)

DSC_0128

So what do you think of my version? I’m liking them, especially the cost savings!


Linking up to:
BWS tips button

OneCreativeMommy.com